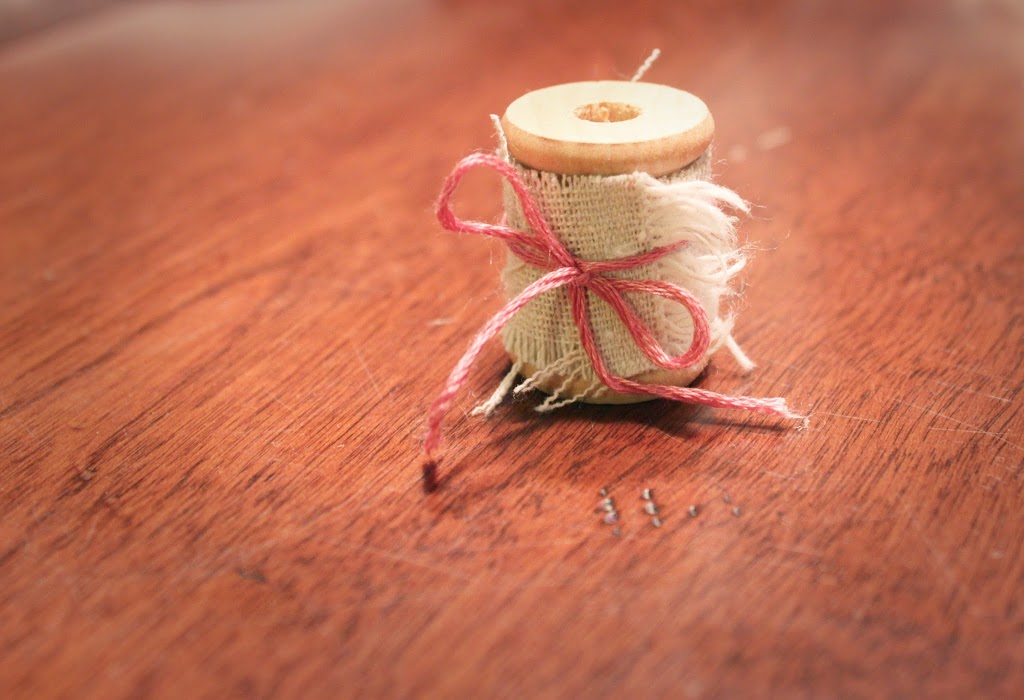
DIY MESSAGE ON A SPOOL
We knew from the beginning we wanted a vintage feel to our wedding so I thought I should incorporate that into wedding party invites. You can change your message & use this idea for anything you want. It’s simple, creative & seems like a lot of fun to open (:
What I used:
- Wooden spools from Michaels
- Muslin fabric
- Black paint (I used acrylic & it worked fine)
- Alphabet stamps
- Hot glue
- Pink string
- Small box
- Twine
- Lace ribbon
- 3 buttons
What I did:
- Measure & cut long strips of fabric to fit the height of the spool. Keep them long, you don’t know how much room you’ll need to write your message & you can always cut them down.
- I wanted the fabric to look a little tattered on the edges so I took some strings out to make it fray & roughed it up a little by sliding my scissors back & forth along the edges.
- I stamped each letter individually with black paint. There are stamp holders you can buy where you slide in each letter so you can spell out entire words & stamp them at once. This way, they are all aligned & evenly spaced. I didn’t even think about it when I was doing this project but I did like being able to control each letter. I’m not that good with stamps, usually I end up missing paint on some part or not pressing evenly. I also wanted it to look “not so perfect” so it worked out for me to just stamp each letter. Find what works for you, though!
- Once it’s dry, cut it to the desired length. Remember to leave a little room to hot glue the end to the spool.
- Hot glue the right side of your fabric to the spool.
- Roll up your message & tie with a bow.
- Inside the box, I put small strips of different shades of pink, tan & cream colored fabric to cushion the spool & keep it from rolling around.
- I put a strip of lace ribbon around the box & secured it with a line of hot glue.
- I started to tie the box with twine to measure where I wanted my buttons to go. I had to adjust it a few times but eventually got them where I wanted them. Tie with a bow & you’re ready to go!
This is what mine turned out like.

I hope someone tries this & sends me one, haha!


Previous
DIY DYED CORK ART
Newer